


You want to stay cool and save money, right? Ceiling fans use much less energy than air conditioners, so they help lower your bills. With proper ceiling fan installation and smart usage, you boost energy efficiency and comfort. Check out these tips for installing ceiling fans and enjoy the benefits of installing ceiling fans in your home.

Key Takeaways
-
Pick a ceiling fan size that matches your room. Put it in the middle of the room. Make sure the blades are at the right height. Keep the blades far enough from the walls. This helps air move well.
-
Stay safe when you put up your ceiling fan. Turn off the power first. Use an electrical box made for fans. Follow the wiring and mounting steps closely.
-
Set the blade direction and speed for each season. Clean your fan often. Make sure your fan is balanced. Think about using smart controls. This can help save energy and keep you comfortable.

Ceiling Fan Efficiency
Why Efficiency Matters
You want to save money and feel cool at home. Ceiling fans help with both. Efficient ceiling fans move air better and lower your bills. These fans use less electricity each month. They make you feel cooler by moving air around. You do not need to turn down the thermostat as much. You can set it about 4°F higher and still feel good. Every degree higher saves you about 3-5% on cooling costs. ENERGY STAR-rated ceiling fans use much less power than old ones. Using the right settings for each season helps you stay comfortable all year.
Common Mistakes
Many people make mistakes that hurt ceiling fan efficiency. Here are some things to avoid:
-
Choosing a fan that is too big or too small for your room.
-
Putting the fan too close to the ceiling or floor.
-
Using an old electrical box that is not made for ceiling fans.
-
Not making sure the fan is tight and secure.
-
Forgetting to set the blades in the right direction.
-
Not cleaning the blades, which makes the fan work worse.
-
Not picking ENERGY STAR-rated fans, so you miss out on savings.
-
Leaving fans on when no one is in the room.
If you avoid these mistakes, your fan will work better. You will save money and feel more comfortable at home.

Choosing Ceiling Fans
Room Size and Placement
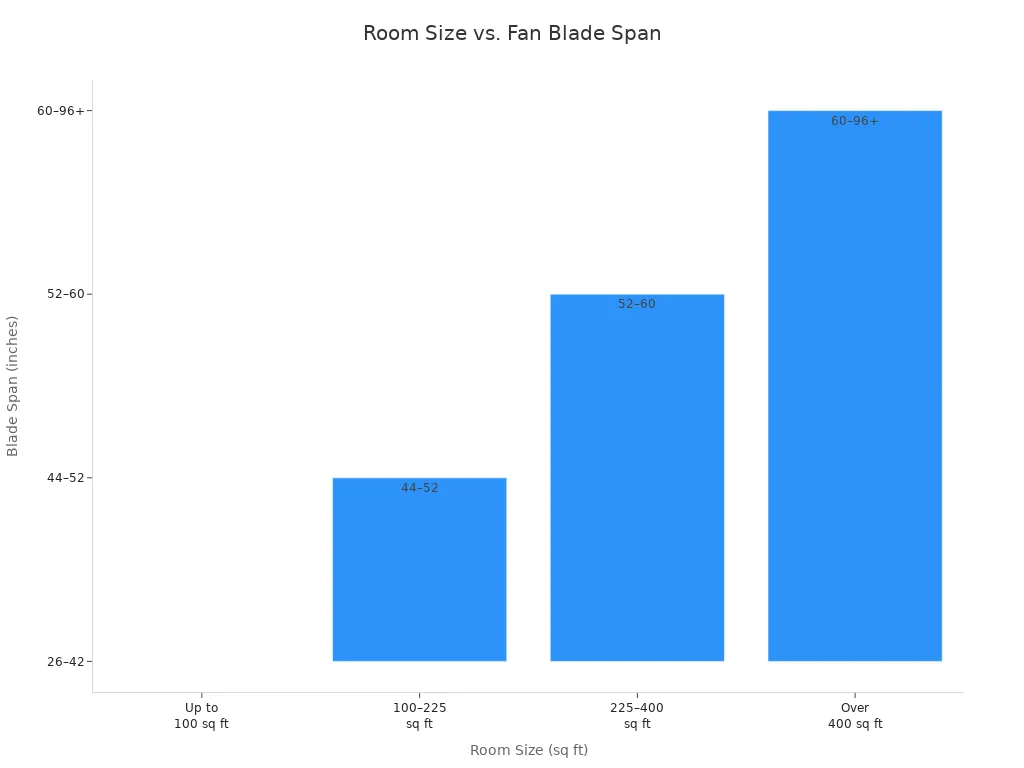
When choosing the right ceiling fans, you want to match the fan size to your room. A fan that is too small will not move enough air, while a fan that is too big can overpower a small space. Take a look at this chart to see what blade span works best for your room size:
|
Room Size (sq ft) |
Blade Span (inches) |
Room Type |
|---|---|---|
|
Up to 100 |
26–42 |
Small bedrooms, offices |
|
100–225 |
44–52 |
Kitchens, dining rooms |
|
225–400 |
52–60 |
Living rooms, master beds |
|
Over 400 |
60–96+ |
Great rooms, open spaces |
Place ceiling fans in the center of the room for balanced air circulation. Keep blades at least 18 inches from walls and 7 feet above the floor. For high ceilings, use a downrod to position the fan 8–9 feet above the floor.
Blade Pitch and Motor
Blade pitch matters for airflow. Fans with blade pitches between 12 and 15 degrees move air efficiently. Steeper pitches push more air but need stronger motors. When choosing the right ceiling fans, look for high CFM ratings and aerodynamic blade designs. DC motors use less energy and run quietly, boosting energy efficiency and comfort.
Smart Features
Modern ceiling fans come packed with energy-saving features. You can set schedules, adjust speeds, and control airflow direction. Some fans use temperature sensors to keep rooms cool without wasting energy. Quiet operation means you can run your fan all day. Smart controls let you manage your ceiling fan from your phone or with voice commands, making life easier and saving money.

Ceiling Fan Installation
Safety First
Before you start ceiling fan installation, safety comes first. You want to protect yourself and your home. Here are some important steps to follow:
-
Turn off the power at the circuit breaker before you touch any wires.
-
Use a voltage tester to make sure no electricity is flowing.
-
Wear safety glasses and gloves to protect your eyes and hands.
-
Use a sturdy ladder on a flat surface. Never stand on furniture.
-
Keep your work area clean and free of clutter.
-
If you feel unsure about any step, ask a professional for help.
Tip: Always read the manufacturer's instructions before you begin. This helps you avoid mistakes and keeps you safe.
How to Install a Ceiling Fan
You can handle ceiling fan installation if you follow the right steps. Here’s how to install a ceiling fan in a way that keeps your fan secure and your room comfortable:
-
Turn off the power at the breaker box.
-
Remove any old light fixture or fan from the ceiling.
-
Make sure you have a fan-rated electrical box. Standard boxes are not strong enough for ceiling fans.
-
Attach the mounting bracket to the electrical box with the screws provided.
-
If your ceiling is high, use a downrod to lower the fan. For standard ceilings, a flush mount works best.
-
Assemble the fan motor and attach it to the bracket.
-
Connect the wires: black to black (live), white to white (neutral), and green or bare to ground. Use wire connectors and electrical tape for safety.
-
Secure the canopy to cover the wiring.
-
Attach the fan blades to the motor. Make sure all screws are tight.
-
Install the light kit if your fan has one.
-
Turn the power back on and test your fan.
Note: Place ceiling fans in the center of the room. Keep blades 8–9 feet above the floor and at least 18 inches from the walls. This gives you the best airflow and keeps everyone safe.
Mounting and Wiring
Mounting and wiring a ceiling fan the right way makes a big difference. Always use a ceiling fan-rated electrical box. These boxes are built to hold the weight and movement of ceiling fans. Standard boxes can loosen over time and cause the fan to wobble or even fall.
When wiring a ceiling fan, follow the color codes. Connect the wires as shown in the instructions. Make sure the ground wire is attached. This keeps you safe from electrical shocks. If your ceiling is higher than 9 feet, use a downrod to lower the fan to the right height. For sloped ceilings, use an angled mount so the fan hangs straight.
Here’s a quick table to help you remember the right distances:
|
Placement Area |
Recommended Distance |
|---|---|
|
Floor to Blade |
8–9 feet |
|
Blade to Wall |
At least 18 inches |
|
Blade to Ceiling |
10–12 inches |
Tip: Always check that your mounting bracket and electrical box are tight and secure before you finish.
Balancing Blades
Balanced blades keep your ceiling fans running smoothly and quietly. Wobbly fans make noise and wear out faster. Here’s how you can balance the blades:
-
Clean each blade to remove dust and dirt.
-
Tighten all screws on the blades and mounting bracket.
-
Measure the distance from each blade tip to the ceiling. Adjust any blades that are higher or lower.
-
If the fan still wobbles, use a balancing kit. Place the plastic clip on each blade to find the one causing the problem. Then, stick a small weight to that blade.
-
Turn on the fan and check for wobble. Repeat if needed.
A balanced fan lasts longer and uses less energy. You get better airflow and less noise. Regularly check your fan for dust and loose screws to keep it running at its best.

Fan Operation Tips
Blade Direction
Getting the blade direction right is one of the best tips for using ceiling fans. You want to make sure your fan spins the right way for each season. This helps you get effective air circulation and saves energy.
-
In summer, set your ceiling fans to spin counterclockwise. This pushes air downward and creates a breeze that makes you feel cool. You can raise your thermostat by a few degrees and still stay comfortable.
-
In winter, switch the fan to spin clockwise at a low speed. This pulls cool air up and pushes warm air down from the ceiling. Warm air spreads through the room, so you feel cozy without turning up the heat.
Here’s a quick table to help you remember the right ceiling fan direction for each season:
|
Season |
Recommended Blade Direction |
Airflow Effect |
Purpose |
|---|---|---|---|
|
Summer |
Counterclockwise |
Pushes air downward |
Makes the room feel cooler |
|
Winter |
Clockwise |
Pulls air upward |
Circulates warm air for better heating |
Changing the direction of your fan each season gives you better air circulation and helps lower your energy bills.
Speed Settings
You can get more from your ceiling fans by adjusting the speed settings. This is another one of those simple tips that makes a big difference in comfort and savings.
-
In summer, use a higher speed to get a strong breeze. This helps with air circulation and makes the room feel cooler.
-
If high speed feels too strong, try medium speed. You still get good air movement without too much wind.
-
In winter, set the fan to low speed. This keeps the air moving gently and spreads warm air without making you feel chilly.
-
Match your fan speed with your thermostat. In summer, raise the thermostat a few degrees and let the fan do the work. In winter, lower the thermostat and use the fan to move warm air around.
-
Use timers or smart controls to run your fan only when you need it. This saves energy and keeps your home comfortable.
You can also adjust your comfort level by slowly changing the thermostat. Try raising it by one degree at a time in summer. Give yourself a week or two to get used to the new setting. If you feel too warm, lower it a bit. This gradual change helps you find the best balance between comfort and savings.
Smart Controls
Smart controls make ceiling fans even easier to use. You can control your fan with your voice or a smartphone app. This means you do not have to get up to change the speed or direction. You can set timers, schedules, and even connect your fan to other smart devices in your home.
-
Voice control lets you turn your fan on or off, change speeds, or reverse the direction just by speaking.
-
Smartphone apps allow you to adjust fan speed, set timers, and create schedules from anywhere. You can make sure your fan runs only when you need it.
-
Smart scheduling means your fan can turn on before you get home or turn off when you leave. This helps with air circulation and saves energy.
-
Some smart fans can adjust their speed based on the room temperature. If the room gets warmer, the fan speeds up. If it cools down, the fan slows down. This keeps you comfortable and saves energy without you having to do anything.
-
Smart fans can also work with other devices, like thermostats or smart speakers. This creates a system that keeps your home at the perfect temperature with less effort.
Tip: Using smart controls and temperature-based speed adjustments gives you the best air circulation and comfort. You save money and enjoy a home that always feels just right.

Maintaining Ceiling Fans
Cleaning
Keeping your fan clean helps it run better and last longer. Dust and dirt can slow down the blades and make the motor work harder. Here are some easy steps you can follow:
-
Turn off the fan and the power at the switch or breaker.
-
Dust the blades every month with a microfiber cloth or a static duster.
-
Every three to six months, do a deeper clean. Use an old pillowcase to trap dust as you wipe each blade.
-
For sticky spots, use a little mild soap and warm water. Do not soak the blades.
-
Clean the motor housing and vents with a soft brush or compressed air.
-
Wipe the pull chain with a damp cloth.
-
After cleaning, check the blades for balance and tighten any loose screws.
You can also use a ceiling fan cleaner with an extendable handle. This tool traps dust and keeps you safe on the ground. Regular cleaning is one of the best maintenance tips for ceiling fans.
Inspections
You should inspect your fan when you clean it. Look for loose screws, wobbly blades, or frayed wires. Make sure the fan is balanced and the mounting bracket is tight. Check the electrical parts for any signs of wear or damage. If you see sharp edges or worn cords, fix them right away. Regular inspections help you catch problems early and keep your fan running safely.
Troubleshooting
Sometimes fans make noise, wobble, or stop working. Here are some common problems and what you can do:
-
Tighten all screws if you hear rattling or see wobbling.
-
Balance the blades if the fan shakes.
-
Lubricate the motor if it squeaks.
-
Check the wiring and switches if the fan will not turn on.
-
Replace batteries or reset the remote if it stops working.
-
Change bulbs if the lights flicker or dim.
Always turn off the power before you start any repairs. If you find a big problem, like sparks or a burnt smell, call a professional. Regular care keeps your fan quiet, safe, and efficient.
You now know the benefits of installing ceiling fans. When you pick smart features, keep your fan clean, and use the right settings, you save energy and feel more comfortable. Many users love easy controls and cool lighting. Try upgrading your fan today for a better home experience!
FAQ
How do you know what size ceiling fan you need?
Measure your room. Use this table to pick the right blade span:
|
Room Size (sq ft) |
Blade Span (inches) |
|---|---|
|
Up to 100 |
26–42 |
|
100–225 |
44–52 |
|
225–400 |
52–60 |
|
Over 400 |
60–96+ |
Can you install a ceiling fan without professional help?
Yes, you can install a ceiling fan yourself. Follow safety steps, read instructions, and use the right tools. Ask for help if you feel unsure.
What direction should your ceiling fan spin in summer and winter?
Set your fan to spin counterclockwise in summer for a cool breeze. Switch to clockwise in winter to move warm air down.

