


You can easily install the best permanent outdoor lights at your home with some planning and the right tools. Start by choosing lights that fit your style and needs, then map out where you want to place them, gather your materials, and follow a few simple steps to install permanent outdoor lights. Many homeowners notice their homes look more inviting and feel safer with permanent outdoor lights. You get curb appeal, energy savings, and year-round convenience. With a diy install, you can boost security and enjoy a hassle-free lighting system that lasts for years.

Key Takeaways
-
Pick outdoor lights that are tough and made from strong stuff like aluminum or stainless steel. These lights can handle different kinds of weather.
-
Plan where you want your lights by marking places to light up, like walkways or patios. This stops dark areas and makes your house look better.
-
Get all the tools and things you need before you start putting in the lights. Being ready helps you work faster and makes things easier.
-
Safety comes first, so turn off the power before you begin. Use a voltage tester to check that the wires are not live.
-
Check your outdoor lights often to make sure they work well. Look for damage, clean the lenses, and change bulbs that do not work right away.

Choose Best Permanent Outdoor Lights
Light Types
You have a lot of choices when it comes to permanent outdoor lights. Some popular brands in 2024 include Govee, Eufy, and Hampton Bay. Each offers different features and price points. Here’s a quick look at some top options:
|
Product Name |
Price |
Features |
|---|---|---|
|
Govee Permanent Outdoor Lights |
$329.99 |
Best app with many presets |
|
Eufy Permanent Outdoor Lights |
$299.99 |
Good app, lots of presets |
|
Hampton Bay Outdoor String Light Kit |
$99.00 |
Inexpensive, less functionality |
You can also find brands like Trimlight, Jellyfish Lighting, Gemstone Lights, and EverLights. These systems work well for year-round use and offer different levels of customization.
Key Features
When you pick the best permanent outdoor lights, you want them to last through all kinds of weather. Look for lights made from strong materials like aluminum or stainless steel. Weather resistance keeps your lights looking good and working well, even in rain or snow. Color and pattern options let you set the mood for any occasion. Adjustable color temperature gives you warm or cool white light, so you can create the right vibe for every season. Smart controls make it easy to change colors or turn lights on and off with your phone or voice.
Lumary’s permanent outdoor lights stand out because of their slide-base design. You can use strong 3M adhesive, clips, or screws for a secure fit. After the holidays, you just slide the lights off for easy storage. The lights offer up to 60 lumens each and let you pick from 16 million colors. You can control them with an app, remote, or even your voice using Alexa or Google Assistant. The lights are IP67 waterproof and built to handle extreme temperatures, so you get reliable performance all year.
Tip: Choose lights with a long lifespan. High-quality permanent outdoor lights can last 10 to 20 years with proper care.
Fit for Your Home
Think about where you want to install your lights. Map out the areas you want to highlight, like your roofline, patio, or walkway. Make sure your lights follow HOA rules. Some neighborhoods have rules about color, brightness, or how lights look from the street. Lumary’s slide-base design helps you stay compliant, since you can remove the lights easily if needed.
Consider brightness, color options, and how you want to control your lights. If you want a diy install, look for systems that come with clear instructions and all the mounting hardware you need. Permanent outdoor lights give you flexibility for holidays, parties, or everyday curb appeal.

Plan Installation
Map Lighting Areas
Start by walking around your home and looking at the spots you want to light up. You might want to highlight your roofline, patio, or walkway. Mapping out your lighting areas helps you avoid dark spots and makes your home look balanced. Try grouping your lights into zones. For example, you can have one zone for your front yard and another for your backyard. This way, you control each area separately and set different moods for each space.
Here’s a quick table to help you plan your lighting zones:
|
Technique |
Description |
|---|---|
|
Creating Lighting Zones |
Group fixtures by location or function for easy control. |
|
Determining Best Zones |
Pick areas that need extra light, like walkways or entryways. |
|
Using Smart Technology |
Use your phone or tablet to control each zone for more flexibility. |
If you use smart lights like Lumary’s permanent outdoor lights, you can set up zones and control them with an app or voice commands. This makes it easy to change colors or brightness for each area.
Power Needs
Next, figure out how much power your lights will use. Most modern outdoor lights use LEDs, which save energy and last longer. Check the wattage of each bulb and add them up to see if your power source can handle it. Here’s a chart that compares the power use of different bulbs:
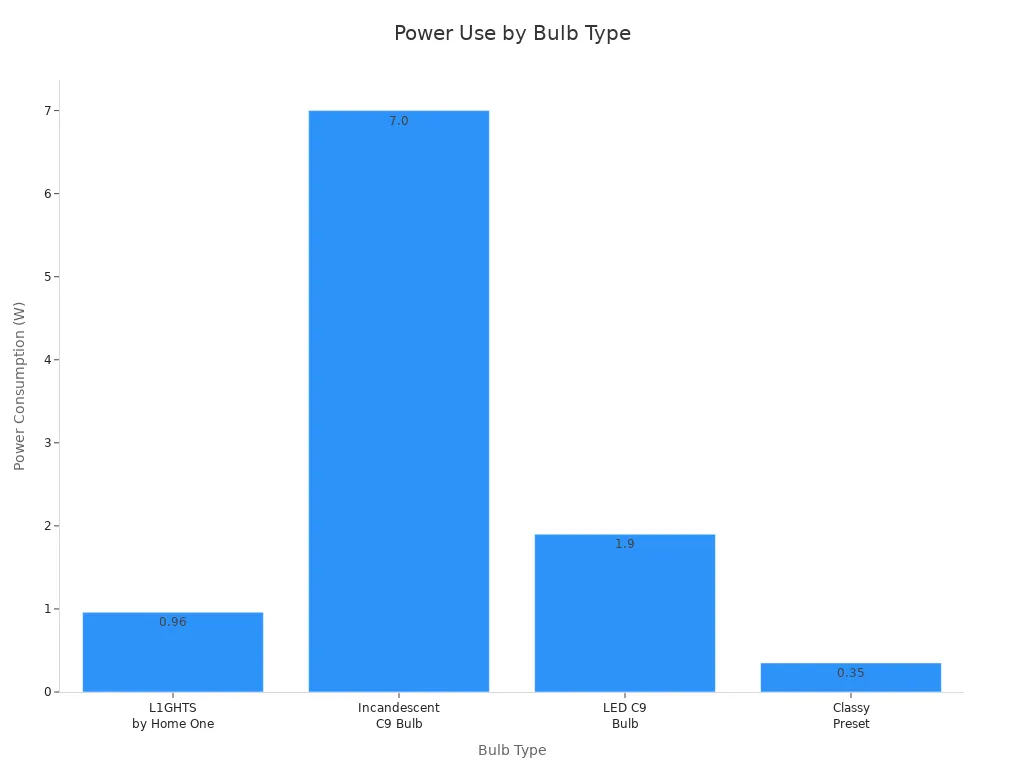
You can see that LED bulbs use much less power than old incandescent bulbs. This means you can install more lights without worrying about overloading your circuit. Lumary’s lights are energy-efficient, so they work well for a diy install.
Tools & Materials
Before you start, gather all the tools and materials you’ll need. This helps your project go smoothly and saves time. Here’s a handy checklist:
-
Two-part lighting system (like Lumary’s slide-base lights)
-
Drill with the right bits
-
Screwdriver
-
Measuring tape
-
Ladder (for hard-to-reach spots)
-
Clips, mounting channels, and extension cables
Before you install outdoor lights, always turn off the power at your main breaker. Double-check with a voltage tester to stay safe.
Clean the surfaces where you’ll attach the lights. Use alcohol pads to remove dirt and dust. This step helps the adhesive or clips stick better and keeps your lights secure all year.

Install Permanent Outdoor Lights
Safety First
Before you start your outdoor light installation, safety comes first. You want to protect yourself and your home. Always turn off the power at your breaker box before you install anything. Use a voltage tester to double-check that the wires are not live. Wear gloves and safety glasses to keep your hands and eyes safe.
Here’s a quick table to help you remember the most important safety steps:
|
Safety Precaution |
Description |
|---|---|
|
Weather-resistant fixtures |
Use fixtures that can handle rain, snow, and sun for long-lasting results. |
|
Secure mounting |
Make sure every fixture is tightly attached to prevent damage or falling. |
|
Proper lighting angles and brightness |
Aim your lights so they brighten your space without causing glare. |
|
Use of motion sensors and timers |
Add these features for energy savings and automatic lighting. |
You should also:
-
Distribute your lights across more than one outlet to avoid overloading circuits.
-
Use ground fault circuit interrupters (GFCIs) for all outdoor outlets.
-
Secure wires and fixtures so nobody trips or damages them.
Prep Surfaces
Clean surfaces before you install permanent outdoor lights. Dirt and dust can keep adhesive or clips from sticking. Use alcohol pads or a damp cloth to wipe down the area. If you use Lumary’s permanent outdoor lights, you get a slide-base design with strong 3M adhesive. This makes it easy to attach the base and slide the lights on or off. You can also use clips or screws for extra stability. The slide-base lets you remove the lights after holidays or for storage, which helps you follow HOA rules.
Tip: Leave 2-4 inches between the lights and the wall. This space gives you a neat look and makes it easier to clean or adjust the lights later.
Mount Lights
Now you’re ready to mount your lights. Start near your power source and work your way out. Use mounting channels for a clean, professional finish. Lumary’s system includes mounting channels, clips, and screws, so you can choose what works best for your home. Make sure the fixture matches the mounting box in weight and size. Pick a spot that’s easy to reach for future maintenance.
Here’s a list of mounting tips:
-
Use manufacturer-approved clips and fasteners for secure anchoring.
-
Choose fixtures with at least an IP65 rating for outdoor use.
-
Pick corrosion-resistant materials like stainless steel if you live near the coast.
-
Plan your install so you can reach the lights for cleaning or repairs.
If you want a diy install, Lumary’s permanent outdoor lights make it simple. The slide-base design means you can mount the base once and swap out the lights whenever you want. The lights are IP67 waterproof and made from anti-UV materials, so they last through rain, snow, and sun.
Wiring & Power
Run your wires along the mounting channels or behind trim for a tidy look. Use wire covers or extension cables to hide and protect the wires. Lumary offers IP67 wire connectors and extension cables for extra weatherproofing. Seal all connections with waterproof covers to keep out moisture. Follow local codes and use GFCI outlets for safety.
Note: Always check the total wattage of your lights. Spread them across multiple circuits if needed to avoid overload.
Test System
After you install permanent outdoor lights, test your system before you finish up. Turn the power back on and check each light. Walk around your home and look at the lights from different angles. Adjust the tilt and rotation to remove hot spots or dark areas. Make small changes to get the best illumination.
Here’s a simple checklist for testing:
-
Check for glare by viewing the lights from every direction.
-
Move fixtures if you see shadows or uneven lighting.
-
Test smart controls, like Lumary’s app, remote, or voice commands.
-
Make sure all connections are sealed and weatherproof.
If you use Lumary’s permanent outdoor lights, you can control each light individually with the Lumary app. You get up to 16 million colors and 110+ preset scene modes. You can even create your own DIY scenes and save them for future use. The lights work with Alexa and Google Assistant, so you can turn them on or change colors with your voice.
Callout: Always test your connections before you finish your install. This step saves you time and helps you catch problems early.
With these steps, you can install permanent outdoor lights that look great and last for years. Lumary’s system gives you all-weather reliability, easy mounting, and smart controls for every occasion.

Professional Finish Tips
Hide Wires
You want your outdoor lights to look neat and tidy. Hiding wires helps make your setup look professional. There are many ways to keep wires out of sight and make your lights look better:
-
Put wires under planters or plants. This hides them and adds some green to your yard.
-
Run wires through rain gutters. This keeps them hidden and you don’t have to dig.
-
Bury wires underground in a conduit. Plan where the wires will go, dig a trench, put in the conduit, and cover it up.
-
Cover wires with mulch or gravel. This makes them blend in with your yard.
-
Tuck wires behind landscape edging or borders.
-
Use copper pipes or painted wood molding to hide wires in a creative way.
-
If you can’t bury wires, use above-ground wire covers. These come in different colors and styles.
When you use permanent outdoor lights like Lumary, you get mounting channels and wire covers. These help you keep wires neat and hidden. You can also run wires behind trim or use extension cables for a smooth look.
Weatherproofing
Outdoor lights have to deal with rain, snow, and sun. You need to protect your lights so they last a long time. Here are some ways to keep your lights safe from weather:
-
Pick fixtures made from strong materials like aluminum or plastic.
-
Seal all electrical connections with waterproof connectors and silicone.
-
Use gaskets and O-rings to stop water from getting in.
-
Put fixtures up high so water does not collect around them.
-
Add protective coatings to block moisture and UV rays.
-
Check your lights often for damage or wear.
-
Use bulbs that are made for outdoor use.
If you pick Lumary permanent outdoor lights, you get IP67 waterproofing and anti-UV materials. The control box is IP65 rated, so it can handle tough weather. You can also use extension cables and wire covers for more protection.
Tip: Always use GFCI outlets for outdoor lights. This helps keep your system safe from shocks.
Smart Controls
Smart controls make your lights easy to use and fun to change. You can use an app, voice commands, or a remote to control your lights. Here’s a table with some popular options:
|
Brand |
Control Options |
Usability Enhancements |
|---|---|---|
|
GOVEE Pro |
App, Voice, Physical Button |
Mature app ecosystem for scenes and automation; longest single-run length per controller. |
|
Lumary Eve Lights Max |
App, Voice, Physical Remote |
Quick manual operation via remote; convenient for non-tech users and quick scene staging. |
|
Eufy E22 |
App, Voice |
Unique house-mapping preview for visualizing scenes before activation. |
With Lumary permanent outdoor lights, you can use the Lumary app to control each light. You also get voice control with Alexa or Google Assistant, and a remote for fast changes. Smart controls let you set scenes, pick colors, and set timers for holidays or every day. You save energy and make your home safer by choosing when your lights turn on and off.
Smart controls give you easy use, energy savings, and more security. You can set up and control your permanent outdoor lights with just a tap or your voice.

Maintenance & Troubleshooting
Routine Care
Taking care of your permanent outdoor lights keeps your home looking bright and safe all year. You want to make sure your lights work well and last a long time. Regular inspections help you spot problems early. Try to check your system at least every three months. This way, you catch issues before they get worse.
Here’s a table with some easy maintenance tasks:
|
Maintenance Task |
Description |
|---|---|
|
Inspecting poles |
Look for damage, warping, or graffiti. |
|
Check Lighting Alignment |
Make sure fixtures point where you want light. |
|
Checking Lighting System Timers |
Confirm timers are set right to save energy. |
|
Group Relamping |
Change bulbs together near the end of their lifespan. |
|
Cleaning and Inspecting Luminaire |
Remove debris, clean lenses, and check surge protection. |
You can also follow this checklist:
-
Check the wiring for damage and secure connections.
-
Clean the lenses and fixtures to keep light bright.
-
Replace burned-out bulbs right away.
-
Adjust fixtures so they stay aligned and mounted.
-
Verify timers and controls work as expected.
-
Trim plants that block light.
-
Look for water damage, rust, or corrosion.
If you use Lumary permanent outdoor lights, you get IP67 waterproofing and anti-UV materials. These features help your lights resist weather and last longer. The slide-base design makes it easy to remove and clean the lights after holidays or for routine care.
Tip: Set a reminder to inspect your outdoor lights every season. You’ll keep your system running smoothly and avoid surprises.
Common Issues
Sometimes, problems pop up even when you take good care of your lights. Here are some issues you might see and how to fix them:
-
Burned-Out Bulbs: Swap out the bulb for a new LED. LEDs last longer and save energy.
-
Flickering Lights: Check for loose wires or faulty bulbs. Tighten connections or replace parts.
-
Lights Not Turning On: Look at your power source, circuit breaker, and the fixture itself.
-
Water Damage: Inspect for moisture inside fixtures. Make sure seals are tight and use waterproof products.
-
Inconsistent Lighting: Check the transformer wattage. Use thicker wire if you notice voltage drops.
-
Moisture Intrusion: Pick fixtures rated for outdoor use. Lumary lights have strong seals to keep water out.
-
Insect and Animal Damage: Use low-heat LEDs and bird-friendly landscaping to keep pests away.
-
Failing Connectors: Inspect connectors for fraying. Replace or call a pro if needed.
-
Electrical Problems or Safety Issues: If you see sparks or smell burning, call an electrician right away.
If you use smart outdoor lights, you might run into connectivity problems. Here’s a step-by-step way to troubleshoot:
-
Make sure your lights work with your home network.
-
Test your Wi-Fi with another device.
-
Restart your lights and router.
-
Update your lighting app.
-
Move the light closer to your router.
-
Check Wi-Fi signal strength.
-
Turn off other devices to reduce interference.
-
Review how many devices use your network.
-
If nothing works, check for firmware updates or ask for professional help.
Note: If you ever feel unsure about a repair, or if you see signs of electrical trouble, don’t wait. Call a licensed electrician for help.
You can put in permanent outdoor lights by following easy steps. First, pick strong fixtures and plan where they will go. This helps you avoid places where people might trip. Next, attach your lights tightly so they stay in place. Test them to make sure they are safe and look good. Clean your lights often and fix any problems quickly. This keeps them working well and looking nice. If you have hard electrical problems, ask a licensed electrician for help.
Taking care of your lights helps them last longer and keeps your home looking good.
|
When to Call a Pro |
Why It Matters |
|---|---|
|
Complex wiring issues |
Keeps everyone safe and follows local rules |
|
Custom lighting design |
Makes your home special and adds security |
|
Local regulation guidance |
Helps you follow rules and avoid trouble |
Enjoy your outdoor space that is brighter and safer all year!
FAQ
How do you control Lumary permanent outdoor lights?
You can use the Lumary app, a remote, or voice commands with Alexa or Google Assistant. The app lets you pick colors, set timers, and create scenes for any occasion.
Are Lumary outdoor lights safe for all weather?
Yes, Lumary lights have an IP67 waterproof rating. They work in rain, snow, and heat. The control box is IP65 rated. You get strong protection for year-round use.
Can you change the color and brightness of Lumary lights?
You can adjust both color and brightness. Lumary lights offer up to 16 million colors and a wide range of white tones. You can set the mood for holidays or daily use.
What makes Lumary’s slide-base design special?
The slide-base design uses strong 3M adhesive, clips, or screws. You can easily remove or store the lights after holidays. This helps you follow HOA rules and keeps installation simple.
Do you need an electrician to install Lumary permanent outdoor lights?
Most homeowners can install Lumary lights themselves. The kit includes clear instructions and all needed hardware. If you feel unsure about wiring, you should call a licensed electrician.

