


Recessed lights are also called pot lights or downlights. They make your home look neat because they sit flat with the ceiling. People might also call them canned lights, canless lights, disk lights, or eyeball lights.
|
Alternative Name |
Description/Typical Use |
|---|---|
|
Canned Lights |
Standard recessed, used in many ways |
|
Canless/Wafer Lights |
Very thin, good for low ceilings |
|
Disk Lights |
Saves space, fits in junction boxes |
|
Eyeball Lights |
Can move, shows off special things |
You put recessed lights in so the parts and wires are hidden. This helps your home feel bigger and more open. Pot lights work in almost any room. They can give bright or soft light. That is why many people use them in new or old homes.

Key Takeaways
-
Recessed lights sit flat with the ceiling. This saves space and makes rooms look bigger and neater.
-
They work by putting a bulb inside a hidden housing in the ceiling. The light shines down evenly and does not hurt your eyes.
-
Picking the right housing, trim, and bulb type gives you the best light. It also helps keep your home safe.
-
Good spacing and installation are needed for even lighting. This stops shadows and saves energy.
-
Recessed lights look modern and save energy with LED bulbs. They add value to your home, but they can cost a lot to install and need careful planning.
Recessed Lights Overview
What Are Recessed Lights
You might notice that pot lights look different from other ceiling lights. Pot lights, also called recessed lights or downlights, fit right into the ceiling. They do not hang down or stick out. This makes your room look clean and open. You can use pot lights in places where you want a simple look, like hallways, kitchens, or bathrooms. Pot lights work well in rooms with low ceilings because they do not take up extra space.
Recessed lighting stands out because it sits almost flush with the ceiling. You do not see wires or bulky parts. Instead, you get a smooth surface and a wide spread of light. Pot lights give you broad, downward lighting that covers a large area. Other ceiling fixtures, like chandeliers or pendants, hang down and become the main focus of the room. Pot lights stay hidden and let your room’s design stand out.
Tip: If you want your space to feel bigger and less cluttered, choose recessed lighting. Pot lights help make small or narrow rooms look more open.
You can use recessed fixtures in many places:
-
Living rooms to highlight art or shelves
-
Kitchens for bright task lighting over counters
-
Bathrooms with moisture-resistant pot lights
-
Hallways and staircases for safety
-
Outdoor patios and decks with weatherproof recessed fixtures
How Recessed Lights Work
Pot lights work by fitting into a hole in your ceiling. The main parts of recessed lighting include the housing, trim, and bulb. The housing hides inside the ceiling and holds the bulb. The trim is the part you see, and it shapes how the light spreads. The bulb sits inside and gives off light.
When you turn on recessed lighting, the bulb shines downward through the trim. This creates a wide, even light that covers the area below. Pot lights do not create shadows or glare like some surface-mounted fixtures. You can use several pot lights together to light up a whole room or just a small area.
Here is a table to show how installing pot lights compares to surface-mounted fixtures:
|
Installation Feature |
Recessed Mounting (Pot Lights) |
Surface Mounting (Other Fixtures) |
|---|---|---|
|
Ceiling Modification |
Needs precise holes in the ceiling |
No holes needed; attaches to surface |
|
Visual Impact |
Flush and almost hidden |
Exposed and sticks out |
|
Installation Complexity |
More complex; needs cutting and wiring |
Easier; mounts directly |
|
Cost |
Usually higher due to extra work |
Lower and faster to install |
|
Best Use |
Low ceilings, new projects, modern look |
Retrofits, exposed ceilings, quick fixes |
You can find pot lights with special features, such as dimming, battery backup for emergencies, or waterproof designs for showers. Some recessed fixtures have adjustable trims, so you can point the light where you need it. Pot lights also come in different sizes and shapes to fit your style and needs.
Note: Always make sure your recessed lighting meets safety codes. Use the right type of housing and wiring for your ceiling and location.
Pot lights give you many options for lighting your home or business. You can use them alone or with other lights to create the perfect look and feel.

Components
Housing
The housing is the main part of a recessed light. It goes inside your ceiling and holds everything together. Most housings are made from aluminum or galvanized steel. These metals make the housing strong and safe with heat. There are different housings for different jobs:
-
New Construction housings are best for new rooms or open ceilings.
-
Remodel housings fit into ceilings that are already built.
-
IC-Rated housings can touch insulation and lower fire risk.
-
Non-IC Rated housings need space away from insulation to stay cool.
-
Airtight housings stop air from moving between rooms and save energy.
Tip: Pick the right housing for your ceiling and insulation. This keeps your lighting safe and works well.
Trim
Trim is the part you see on the recessed light. It covers the edge of the housing and changes how the light looks in your room. There are many trim styles, and each one changes the light and style. Baffle trims have deep ridges that soak up extra light and cut glare. This makes your room feel soft and cozy. Smooth trims are flat and let more light out, so your room looks bright and modern.
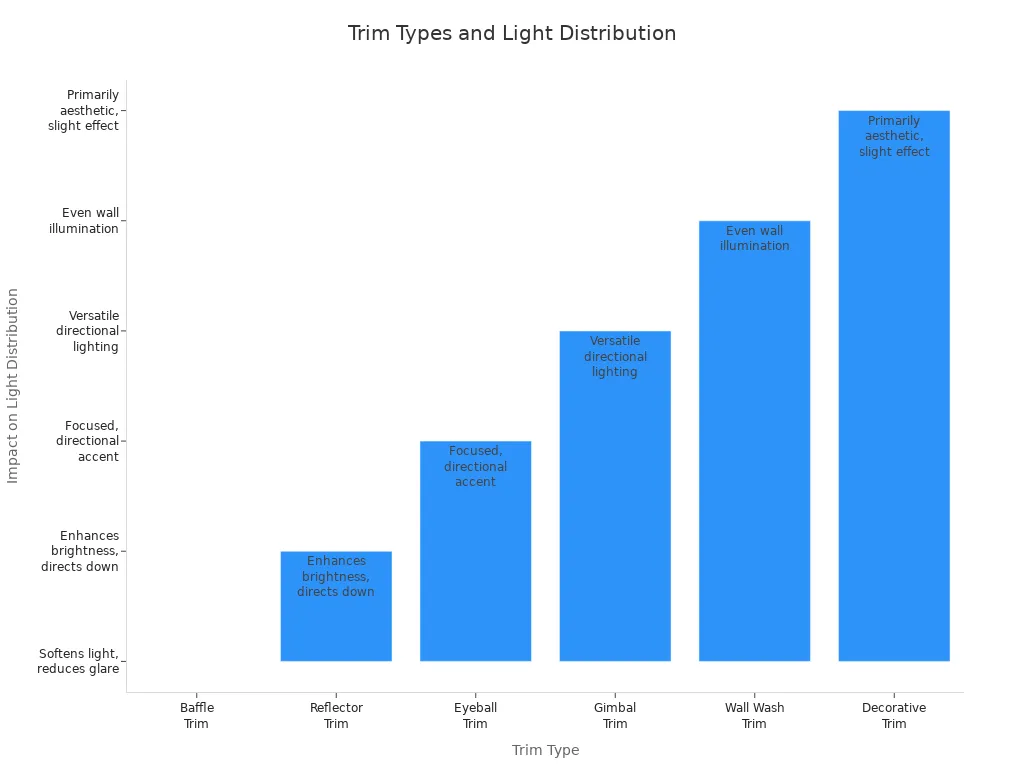
Here is a table to help you compare popular trim types:
|
Trim Type |
Design Features |
Pros |
Cons |
Impact on Light Distribution |
Suitable Applications |
|---|---|---|---|---|---|
|
Baffle Trim |
Ridged interior surface |
Reduces glare, softens light |
Slightly reduces brightness |
Softens light, reduces harsh glare |
Living rooms, bedrooms |
|
Reflector Trim |
Smooth, shiny inner surface |
Maximizes brightness |
Can cause glare |
Boosts brightness, directs light down |
Kitchens, home offices |
|
Eyeball Trim |
Adjustable, moves to aim light |
Directs light where needed |
More expensive |
Focused, directional accent lighting |
Art, architectural features |
|
Gimbal Trim |
Adjustable, wide range of motion |
Flexible for aiming light |
More expensive |
Versatile, good for sloped ceilings |
Sloped ceilings, special areas |
|
Wall Wash Trim |
Directs light across walls |
Even wall illumination |
Needs careful placement |
Highlights textures and colors |
Hallways, art displays |
|
Decorative Trim |
Stylish, many designs |
Adds visual interest |
Sometimes less functional |
Aesthetic, may affect light spread |
Dining rooms, entryways |
Bulb
The bulb is what makes light inside your recessed fixture. You can pick from different bulbs, and each one lasts a different amount of time. Incandescent bulbs are the oldest and last about 1 to 3 years. Halogen bulbs are brighter and last a little longer. Compact fluorescent (CFL) bulbs use less energy and can last up to 9 years. LED bulbs are the newest and most efficient. They can last over 25 years and use much less energy than other bulbs.
Here is a table showing the most common bulb types and how long they last:
|
Bulb Type |
Typical Lifespan (Years) |
Notes on Usage and Efficiency |
|---|---|---|
|
Incandescent |
1-3 |
Least efficient, produces more heat |
|
Halogen |
2-4 |
Brighter, longer lasting than incandescent |
|
Compact Fluorescent (CFL) |
5-9 |
Energy-efficient, contains mercury |
|
LED |
25+ |
Most efficient, very long lifespan, dimmable |
LED bulbs use much less energy than incandescent or halogen bulbs. For example, a 10-watt LED can shine as bright as a 60-watt incandescent. LEDs also stay cool, which helps your light fixture last longer and keeps your room comfortable.

Types of Recessed Lighting
Trim Styles
You can choose from many trim styles when picking pot lights. Each trim changes how your recessed lighting looks and works in your space. Here are some common trim styles:
-
Eyeball Trim: Lets you point the light where you want. Great for showing off art or special spots.
-
Wall Wash Trim: Spreads light across a wall. Use this to highlight artwork or textured walls.
-
Gimbal Trim: Pivots so you can aim the light. Works well on sloped ceilings or for accent walls.
-
Pinhole Trim: Makes a narrow beam. Use this to spotlight small details.
-
Slotted Trim: Hides most of the bulb, leaving a small slot for a focused beam.
-
Decorative Trim: Adds style with different shapes and finishes.
-
Shower Trim: Has a glass cover to keep out water. Perfect for bathrooms and showers.
You can also pick from baffle trims, which reduce glare, or reflector trims, which make rooms brighter. Metal trims last longer and handle heat well. Plastic trims come in many colors to match your décor.
Tip: Choose a trim style that fits your room’s needs and your personal taste.
Light Sources
The type of bulb you use in your pot lights affects how long they last and how much energy they use. LED recessed lighting is the most popular choice today. LEDs last much longer than old-style bulbs and use less power. For example, if you use your LED recessed lighting for 3 hours a day, it can last over 45 years! Even at 12 hours a day, it can last more than 11 years.
|
Aspect |
LED Recessed Lights |
Incandescent Bulbs |
|---|---|---|
|
Lifespan |
15,000–50,000 hours |
1,000–2,000 hours |
|
Energy Consumption |
Up to 85% less |
High |
|
Heat Generation |
Low |
High |
|
Durability |
Strong |
Fragile |
|
Maintenance |
Few replacements needed |
Replace often |
LEDs also stay cool and work well in damp places. You can find pot lights with smart features, like dimming or color changes. Incandescent bulbs cost more to run and need replacing often.
Specialty Options
Some types of recessed lighting work in special places or for unique needs. Shower trims use watertight seals and strong glass to keep out moisture. You can use these in bathrooms or above showers. Adjustable trims, like eyeball or gimbal, let you aim the light where you need it most. Wall-wash trims help you show off art or brighten up a hallway.
Pot lights come in many sizes and shapes, such as round or square, and can fit flat or sloped ceilings. You can pick from shallow or deep housings to match your ceiling space. Specialty recessed lighting gives you more control and safety, especially in wet or tricky spots.
Note: Always pick the right type of pot lights for your room. This keeps your lighting safe and looking great.

How to Install Recessed Lights
New Construction vs Remodel
When you plan how to install recessed lights, you need to know if your project is new construction or a remodel. New construction fixtures attach to ceiling joists before you put up drywall. This gives you solid support and makes it easier to run wires. You also get more choices in style and trim. Remodel fixtures work best when you already have a finished ceiling. You cut a hole, push the housing in, and secure it with clips that grip the drywall. Remodel housings cost a bit more and need careful planning to avoid damage. Both types need you to check if your ceiling has insulation. If it does, use IC-rated fixtures to prevent heat problems and save energy.
-
New construction: Install before drywall, more support, easier wiring, more style options.
-
Remodel: Install in finished ceilings, use clips, careful planning, higher cost.
-
Always check insulation and use IC-rated fixtures if needed.
Safety Tips
You must follow safety rules when you install pot lights. The National Electrical Code says you need fixtures rated for your ceiling type. If your ceiling has insulation, only use Type IC fixtures. These can touch insulation without causing fire risks. Never put insulation too close to non-IC fixtures. Keep at least 3 inches of space unless the fixture is IC-rated. Use proper circuit protection and make sure your lights are listed for their use. Local codes may require permits and inspections. If you are not sure, ask a licensed electrician. Safe installation keeps your home protected.
Tip: Always turn off power at the breaker before you install pot lights or do any wiring.
Placement and Spacing
Good placement makes your pot lights look and work better. The basic rule for how to install recessed lights is to space them about half the ceiling height apart. For an 8-foot ceiling, place lights about 4 feet apart. Keep each light 1.5 to 3 feet from the wall. This stops shadows and gives even light. In bigger rooms or with higher ceilings, you can space lights 6 to 8 feet apart. Adjust spacing if you want more or less brightness. Think about what each room needs before you install pot lights.
-
Divide ceiling height by two for spacing.
-
Place lights 1.5–3 feet from walls.
-
Adjust for room size and brightness.
Note: Careful installation considerations help you get the best results when installing pot lights.

How Much Does Recessed Lighting Cost
Factors Affecting Cost
When you ask how much does recessed lighting cost, you need to look at several things. The number of fixtures you want plays a big role. Each light usually costs between $125 and $300 to install. This price includes the fixture and labor. If you plan to add six to eight lights in a standard room, you can expect a total cost between $700 and $2,100. The type of ceiling also matters. Drywall ceilings are easier and cheaper to work with. Plaster, vaulted, or beamed ceilings need more time and special housings, which raises the cost.
Here is a quick table to help you see the main cost factors:
|
Aspect |
Cost Range (USD) |
|---|---|
|
Cost per recessed light |
$125 to $300 |
|
Labor per light |
$75 to $200 |
|
Fixture cost per light |
$50 to $100 |
|
Total for 6 lights |
$700 to $1,650 |
|
Total for 8 lights |
$850 to $2,100 |
|
New construction per light |
$65 to $175 |
Wiring complexity can add $200 or more per light. If you need drywall repair or paint touch-ups, you might pay an extra $50 to $300. Dimmer switches also add to the total.
Tip: Always check what to consider before buying. Think about ceiling type, fixture style, and how many lights you need.
Installation vs. DIY
You might wonder if you should hire a pro or do it yourself. Professional installation costs more because you pay for labor, which ranges from $75 to $200 per fixture. Electricians also charge for permits and repairs. If you do it yourself, you save on labor but still pay for materials, tools, and permits. DIY costs usually range from $50 to $130 per fixture.
|
Cost Aspect |
Professional Installation |
DIY Installation |
|---|---|---|
|
Labor Cost |
$75 to $200 per fixture |
$0 |
|
Materials & Tools |
Included or extra |
$50 to $130 per fixture |
|
Permits |
$50 to $200 |
$50 to $200 |
|
Drywall Repair |
$10 to $50 per patch |
$10 to $50 per patch |
|
Total Typical Cost Range |
$75 to $200+ per fixture |
$50 to $130 per fixture |
If you have electrical skills, DIY can save money. If not, hiring a pro keeps your home safe and up to code. Always weigh the risks and benefits before you decide.
Pros and Cons
Benefits
You get many advantages when you choose recessed lighting for your home. Most homeowners like how these lights save space and make rooms feel bigger. The flush design works well in small rooms or places with low ceilings. You can enjoy even light across your space, which helps you see better and makes your home feel more open.
Here are the top benefits of recessed lighting:
-
Space-saving design keeps your ceiling clear and uncluttered.
-
Even light distribution gives you uniform brightness in every corner.
-
Sleek, modern look blends into your ceiling for a clean style.
-
Energy efficiency saves you money, especially with LED bulbs.
Many new homes include recessed lighting because it creates a modern feel and adds value. Appraisers often see these lights as a sign of good updates. Buyers like homes with this type of lighting because it makes rooms look larger and more inviting. You can also use dimmers to set the mood, which adds to your comfort.
|
Benefit |
Description |
|---|---|
|
Space-Saving Design |
Flush installation creates a clean look, perfect for low ceilings and small rooms. |
|
Versatile Lighting |
Works for general, task, or accent lighting in any room of your home. |
|
Energy Efficiency |
LED recessed lights use much less energy and last longer, lowering your bills. |
|
Modern Appeal |
Most new homes feature recessed lighting, showing its popularity and practicality. |
Drawbacks
You should also know about the drawbacks before you add recessed lighting to your home. Some people find the installation process hard and costly. You need to cut holes in your ceiling, which can lead to air leaks and higher energy bills if not sealed well. Sometimes, the trim can sag, exposing the fixture and causing drafts or safety risks.
Common complaints include:
-
High installation cost and the need for careful planning.
-
Possible fire hazards if you use the wrong type of fixture or bulb.
-
Air leaks from ceiling holes can reduce your home's energy efficiency.
-
Lights may blink or turn off if they overheat or if you use the wrong wattage.
-
You may need several fixtures to avoid dark spots, which increases the total cost.
-
The "cave effect" can happen if you do not space the lights well, leaving walls in shadow.
If you want the best results, make sure you use the right fixtures and follow safety rules. Good planning helps you avoid most problems and keeps your home safe and comfortable.
Recessed lights give your home a clean look and flexible lighting. You get even light, energy savings, and a modern feel. Before you choose, think about what to consider before buying: room size, ceiling height, trim style, and your budget. For best results in your home, plan your layout, use LED bulbs, and clean the trim often. If you want safe and lasting lights, hire a pro for complex jobs. Good planning helps your home shine and keeps maintenance simple.
FAQ
Can you install recessed lights in any ceiling?
You can install recessed lights in most ceilings. Check for enough space above the ceiling and avoid joists or pipes. Use special housings for sloped or insulated ceilings. Always follow safety codes.
Do recessed lights work with dimmer switches?
Yes, most recessed lights work with dimmer switches. Make sure you use dimmable bulbs and compatible dimmers. This lets you control the brightness and set the mood in your room.
How do you clean recessed lights?
Turn off the power first. Remove the trim and bulb. Wipe the trim and bulb with a soft, dry cloth. Avoid using water or harsh cleaners. Replace everything when dry.
Are recessed lights energy efficient?
LED recessed lights use much less energy than older bulbs. You save money on your electric bill and change bulbs less often. Choose LED options for the best efficiency.

