


When it comes to smart ceiling lights, the possibilities are endless. Imagine effortlessly controlling your lighting with just a tap on your phone. The Smart LED Ceiling Light offers a seamless experience, designed to fit any standard fixture with its contemporary brushed nickel finish. Setting up your smart light is crucial for unlocking its full potential. To begin this exciting journey, gather essential tools like a screwdriver and ensure you have the Smart LED Ceiling Light and its components ready. Let's dive into the world of convenient and customizable lighting!
Preparing for Installation
Gathering Necessary Tools and Materials
List of tools required:
-
A screwdriver set
-
Measuring tape
-
Drill with appropriate drill bits
-
Ladder or step stool
-
Level
Ensuring you have the smart light and its components
To ensure a smooth installation process, gather all the necessary tools and materials listed above. Having these items ready will make setting up your Smart LED Ceiling Light much more efficient.
Safety Precautions
Turning off the power supply
Before starting any installation work, remember to turn off the power supply to avoid any electrical accidents. Safety should always be a top priority when dealing with electrical fixtures.
Using a stable ladder
When reaching high areas for installation, make sure to use a stable ladder or step stool to prevent any falls or injuries. Your safety is paramount throughout the setup process.
Installing the Smart Ceiling Light
Removing the Old Light Fixture
To begin unscrewing and detaching the old fixture, locate the screws holding it in place. Use your screwdriver to carefully remove each screw, ensuring a smooth detachment process. Once all screws are removed, gently lower the old fixture down to access the wiring.
When it comes to handling wiring safely, remember to first identify the wires connected to the old light fixture. Using caution, disconnect these wires by carefully untwisting them. Ensure that there is no power running through the wires before proceeding with this step for your safety.
Mounting the New Smart Ceiling Light
Attaching the mounting bracket
Start by attaching the mounting bracket securely to the ceiling. Use appropriate screws and ensure that it is level and stable before proceeding further. The mounting bracket serves as a foundation for your new smart ceiling light, so its proper installation is crucial for stability.
Connecting the wires
Next, focus on connecting the wires from your smart ceiling light to those in your ceiling. Match each wire based on color or labeling provided in the instructions. Securely twist each wire connection together and cover them with wire nuts for added safety and stability.
Securing the light fixture
Once all wires are connected, secure your new smart ceiling light onto the mounting bracket. Follow any specific instructions provided by the manufacturer to ensure a proper fit. Check that the light is firmly attached and does not wobble before moving on to setting up its smart features.
Setting Up the Smart Features
Downloading and Installing the App
Finding the app in the app store
-
Search for Smart Ceiling Light app in your device's app store.
-
Locate the official app developed for your specific smart ceiling light model.
-
Ensure that you download the correct app to access all features seamlessly.
Installing and opening the app
-
Once the download is complete, install the Smart Ceiling Light app on your smartphone.
-
Open the newly installed app to begin exploring its functionalities and settings.
-
Familiarize yourself with the layout of the app interface for easy navigation.
Connecting the Light to the App
Pairing the light with your smartphone
-
Access your smartphone's Bluetooth settings to enable pairing with your smart ceiling light.
-
Follow the on-screen instructions within the Smart Ceiling Light app to pair your device successfully.
-
Wait for a confirmation message indicating that your light is now connected to your smartphone.
Configuring settings and preferences
-
Within the Smart Ceiling Light app, navigate to settings to customize various options.
-
Adjust brightness levels, set schedules, or explore color-changing features based on your preferences.
-
Experiment with different configurations to create personalized lighting experiences tailored to your needs.
Testing and Troubleshooting
Testing the Light
Turning the power back on
-
Restore power to your Smart LED Ceiling Light by flipping the switch or turning on the circuit breaker. Ensure a stable power supply for proper functionality.
-
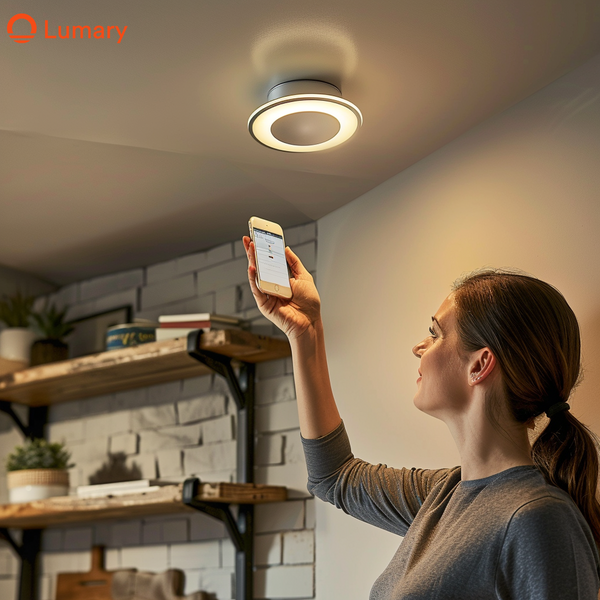
Observe as the light illuminates, showcasing its brightness and color options. Experience the convenience of controlling your lighting with just a tap on your smartphone.
Checking if the light responds to app commands
-
Open the Atomi Smart app on your phone to test the responsiveness of your smart ceiling light.
-
Try adjusting brightness levels, changing colors, or setting schedules through the app to see how your light reacts.
-
Enjoy seamless control over your lighting ambiance from anywhere in your home with a simple touch on your device.
Troubleshooting Common Issues
Light not turning on
Some customers have praised the Smart LED Ceiling Light for its easy installation and compatibility with Alexa automation. They appreciate its soft, natural lighting for various activities like makeup application and selfies. However, if you encounter issues with your light not turning on, check the power source and ensure all connections are secure.
Connectivity problems
-
If you face connectivity challenges with your smart ceiling light, consider resetting both the light and your smartphone's Bluetooth settings.
-
Verify that you are within range of the device and that there are no obstructions hindering communication between them.
-
Explore online forums or reach out to customer support for further assistance in resolving any connectivity issues promptly.
-
Summarize the setup steps you've followed to install your Smart LED Ceiling Light successfully.
-
Discover the versatility of your smart light by exploring its various features and functionalities.
-
Remember to conduct regular maintenance checks and follow safety guidelines for prolonged usage.

